
Hello 3rd and 4th grade.
June 2-5 Art Lesson: Thumbprint Family Tree
MATERIALS:
White Paper
Black or brown thinned down tempera paint, dark watercolor paints or ink
Straw
Green and Yellow stamp pad or thinned down tempera paint or watercolors
Your index finger 🙂
Sharpie pen or marker to write down the names of your family
DIRECTIONS:
FOR THE TREE TRUNK
Using a straw, drip a few drops of thinned down black or brown paint on a white piece of paper towards the bottom of the page. Then blow the blob of paint or ink up to the top of the paper. Watch where the stream of paint goes. You can control it if you watch what it does. You want to blow hard, to get the paint to “branch” out. Keep adding paint if you run out. Make a big tree with lots of branches!
If you have ink, that is the best material for this you use that instead. Be careful to protect the surface you are working on, as ink stains! LET IT DRY.
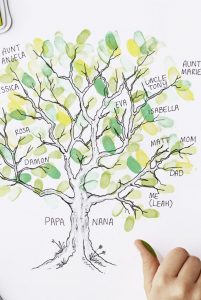
It should look something like this:

FOR THE LEAVES:
Use your fingers to make finger print leaves on the branches of your straw blown tree. put leaves ALL over. With your pen write down the names of your mom and dad, grandparents and brothers and sisters. Ask your parents for help on this if you don’t know how to spell their names.
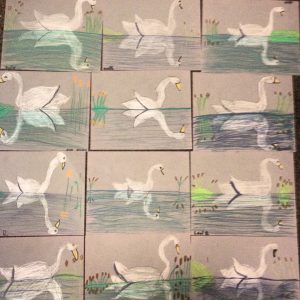
Please post your artwork in Google Classroom, I look forward to seeing it and you!
May 26-29 2020
Art Lesson: Draw Something SILLY
For this weeks art lesson I want you to use your imagination. All you need is a pencil and paper. Be as creative as you can be!
- Draw a design for a $3 bill.
- Draw a bicycle riding a bicycle.
- Draw a Ferris wheel on top of a mountain.
- Draw a pencil sharpener eating something other than a pencil.
- Draw a marker painting a picture.
- Draw an animal made out of candy.
- Draw a pair of shoes made out of flowers.
- Draw a bowl of cereal under the sea.
- Draw a crying crayon.
- Draw a cabin on top of a cloud.
- Draw a pair of scissors running.
- Draw a mountain topped with glitter.
- Draw the Statue of Liberty eating pizza.
- Draw lightning striking the tallest building in the world.
- Draw a treasure chest in an underground cave.
May 19-22 2020
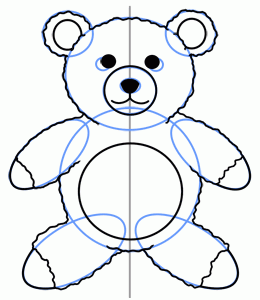
Art Lesson: Teddy Bears on Parade
Hello everyone! This week we are going to draw and make a Teddy Bear. I will show you how. Mrs. Sanchini is asking everyone to place a teddy bear or a drawing of a teddy bear in a visible area like on a windowsill, a porch or near a mailbox.
We would like you to decorate the Teddy Bear for Memorial Day by adding a US flag or other patriotic symbol. Send Mrs. Sanchini lsanchini@hamptonschool.org a picture of your Teddy Bear and don’t forget to share it in Google Classroom with me. The Teddy Bears are going to be in a parade for Memorial Day.
MATERIALS:
White and Black Paper, or you can cut up a clean
Brown Paper Bag to make your Teddy Bear
pencil, erasure
crayons
Permanent sharpies markers
Glue if you are going to cut out a Bear.
DIRECTIONS:
Gather together your materials. You need to decide on what kind of Teddy Bear you will make. If it’s a black and white bear, start with a white piece of paper. If it’s a brown bear, start by cutting a brown paper bag and opening it up, and flatten it out.
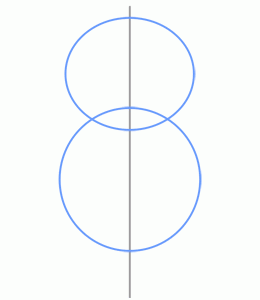
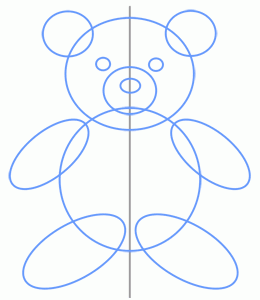
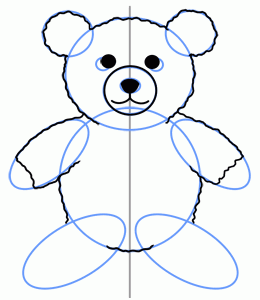
Now we can draw with pencil first, the shape and size of the bear. Teddy Bears are soft and cuddly and made up of round circles and ovals. Start with a large circle for the Teddy Bears body. The circles done have to be perfect 😉 Next draw a smaller circle for the head and place it on top of the body, add two small circles on top of the bears head for the ears. Add ovals for the legs and smaller ovals for the arms. Then add the details of the bears face. Two circles for the eyes, a small circle for the bears muzzle in the center, then an even smaller circle for the nose. The mouth is a straight line down from the small circle of the nose, and at the end of that line, add two small upside down “C’s” on each side of the straight line to finish the mouth.
Erase any lines that overlap and color in your bear. Chalks work great on brown paper. Use a black marker for the details like paws, and eyes.
If you are building your bear cut out the shapes of the circles and glue them together.
May 12-15 2020
Art Lesson: Art Review…How is it going?
Grade 3 will be meeting in Google Classroom Meet on Tuesday, May 12th at 9:30 am.
Grade 4 will meet in Google Classroom Meet on Wednesday, May 13th at 9:30 am.
I will want to see how you are doing and any ideas or thoughts you have about making art online. How are the Art assignments I’ve given you progressing? I really miss you all and am excited to start our Art Lessons in Google Classroom Meet.
Please prepare any questions you have and bring in any of the art projects you’ve been working on.
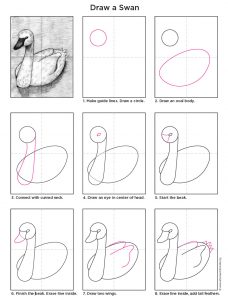
May 5-8 Art lesson: Swan Reflections Art Lesson
There are two ducks in my pond, and I was watching them swim today. It got me thinking about reflections, so this week we are going to think about symmetry and reflections. Try to match up the reflection of the swan on each side of the horizon line by turning your paper as you work. Don’t forget to add details like a frog or a turtle…maybe some cattails?
MATERIALS:
grey or blue construction paper or card stock,
pencil & eraser
white crayon or chalk
crayons
DIRECTIONS:
Begin by turning your paper horizontal. Then draw a horizontal line across the center of the paper as the horizon line. This is the line that the swan or duck will sit on. Draw an oval for the swans body on the horizon line, flip the paper and draw the oval again for a reflection. Start with the swan’s neck and head and then repeat it on the reflection. Stop after each step when drawing the bird and turn your paper sideways to see and look at the symmetry of the drawing to make corrections. Go on to the tail, wing and beak.
Using a black marker draw the eye and line on the bottom of the beak. Start by coloring in the swan and it’s reflection. Start the water at the horizon line and continue horizontal lines all the way to the bottom of the paper to show water. You will be coloring over the swans reflection with blue crayon. Add grasses sticking out of the water and the reflections.
Optional:
If you don’t have any colored construction paper, you can use white paper and draw a duck on the horizon line instead of a swan. You may need to look up what a duck looks like to draw it correctly.

April 28th-May 1st 2020
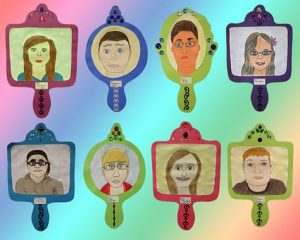
Art lesson: Mirror, mirror on the Wall
You have been doing a great job on drawing and building your portraits. When we make art, the artwork usually gets framed. I would like you to draw a frame around your self-portrait that you made from drawing portraits two weeks ago. A frame is meant to show off the artwork and can be very fancy or very plain. I’d like to see what shape you would use to make a frame around your self-portrait.
Here are some examples of drawn frames. Notice how cool the frame looks around your self-portrait drawing! I am excited to see what patterns and designs you are going to use for your frame.
If you wish, instead of a mirror on the wall, consider designing a HAND mirror, or a mirror you hold in your hand.
What might that look like?
Be sure to use Good Craftsmanship in drawing and
outlining your frame.
Materials:
Your Self-Portrait drawing from 2 weeks ago
or a piece of White paper bigger than your
Self-Portrait drawing. If you don’t have it consider drawing
another one. It’s good practice!
pencil,
erasure
scissors
glue stick
black sharpie or thin black marker for the outline of the frame.
for color: crayons, colored pencils…
Directions:
Decide on a basic shape for your frame. It could be a rectangle, oval or circle. Draw in pencil first. Make a design using a pattern. Use thick and thin lines, and repeat shapes to go around the edge of the frame. Take your time and develop your frame directly on the paper you made your self-Portrait on, or if you rather draw the frame on a separate paper, you can cut out your portrait to fit inside your frame.
April 21th-24th
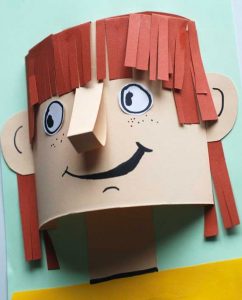
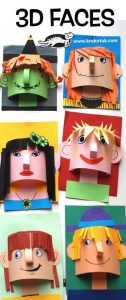
Art lesson: 3-D Portrait Faces
You worked hard on drawing a portrait last week. For this weeks Art lesson, try to build a 3-dimensional face out of paper! This video shows you how.
https://www.youtube.com/watch?v=etdrI8FXmD0
Materials:
Colored paper
scissors
glue stick
markers
imagination
Directions:
When you make your face, it doesn’t have to be yours or someone you know. You can make ANY face you want!
Watch the video, and pause it as you are working. https://www.youtube.com/watch?v=etdrI8FXmD0
Take your time and don’t forget to add a neck! The face is made by rounding out a half sheet of paper, glued to a background paper by folding little tabs on the side. The nose is a strip of paper that is folded in half and shorter on one side to make a shape that looks like the letter “D”. Save room for the forehead!
I am really looking forward to seeing what you create.
Hello, 3rd and 4th grade.
April 14th-17th
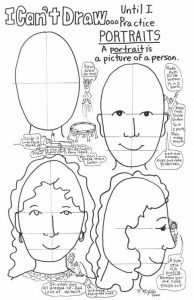
New Art lesson: Drawing Portraits
Portrait drawing can be fun if you know the correct proportions of the face. Once you do you CAN draw faces accurately. Try to capture the likeness of your family in a portrait. See how close your drawing looks to the person you are drawing. You might even consider making a portrait of your favorite musician, actor, actress, or movie hero.
There are 3 views to consider when drawing a picture of a face. A front face, a side face and a 3/4 face. A front face is a picture of the person facing directly towards you. A side face view is called a profile and is the side view of a persons face. The 3/4 view means that the persons face is not directly in front or to the side, it’s in between a full front view and a side profile. Adults can help demonstrate the three different portrait views.
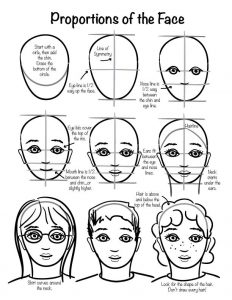
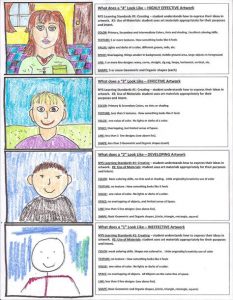
What does it mean to do a GOOD JOB on your art work? Click here on ART Criteria
and download the PDF file.
Materials:
Drawing Paper 9″x 12″
Pencil
Erasure
Markers
Crayons.
Directions:
Decide if you are drawing a Front View or a Side View of a face. Find a quiet spot to concentrate and follow each step by step on how to draw the proportions of a front view face. There are many different ways to draw a face, so if do the steps differently, it’s okay. Just be sure to divide your paper into 1/4th with guide lines to help you line up the nose, mouth and eyes.
April 7th-10
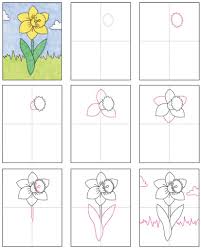
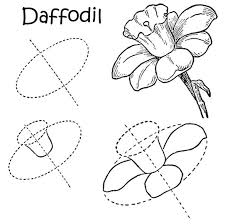
New Art lesson: Daffodils
Have you notices that the Daffodils are blooming? Artists look to nature to be inspired!
Let’s make a Daffodil painting. Keep in mind that the Daffodils petals overlap.
Try to add overlapping shapes in your picture of Daffodils.
Materials:
White paper heavy paper or cardboard or canvas, if you have it.
pencil, erasure
Any kind of paints, if you have them.
Yellow, red, orange, green and blue are the colors most used.
Watercolors, tempera or acrylic paints work the best. But you can.
use colored pencils, crayons or markers if you don’t have paints.
Directions:
Take a very close look at the sheet that shows you step by step how to draw a daffodil.
You can practice on a separate sheet of practice paper until you are comfortable with the steps.
On your final sheet of paper, fill it with large, medium and small daffodil shapes. T
his step is very important and is called making a composition.
You are the boss of where the daffodils go on your paper.
Don’t forget to make the stems. Connect the stem to the back of the cup of the daffodil.
This is a good place to practice overlapping. The sky goes in the background and
there is green grass in front of the flowers.
Or if you wish, you could make a vase of Daffodils, up to you 🙂
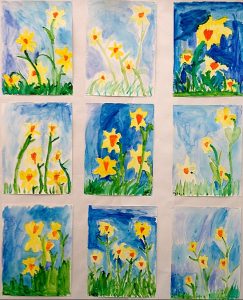
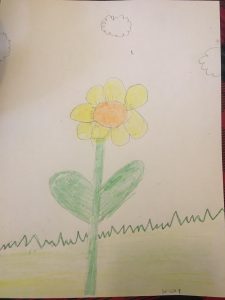
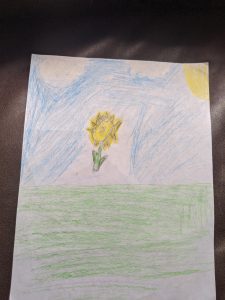
Check out Hunter’s and Sarissa’s Daffodil drawings!
I noticed you have an assignment to Share a Rainbow. What can you use to draw a rainbow? Paper and pencil, of course to draw it out. But is it a big rainbow, do the colors Red, Orange, Yellow, Green, Blue and Purple blend into each other? Is the sun out? Is there a pot of Gold at the end of your rainbow? Or a leprechaun? Imagine what you could do with a rainbow! Here is a water color rainbow. What about a clay rainbow or tissue paper rainbow? The sky’s the limit 🙂