
Hello 1st and 2nd grade.
June 2- 5
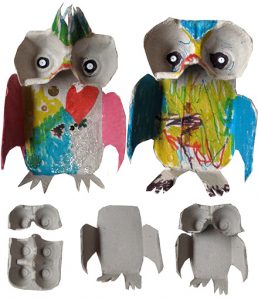
Art Lesson: Egg Carton Owls
Every now, I catch sight of an owl in my backyard tree and it’s a big owl!
Check out this simple art project for making Egg carton Owls.
MATERIALS:
egg cartons,
scissors,
glue & paint or markers
DIRECTIONS:
1. Cut off the base of the carton & cut as shown
2. Cut wings from the side
3. Cut feet from the top
4. Glue the two pieces together
5. Stick on buttons for eyes
6. Color & decorate your owl
May 26-29 2020
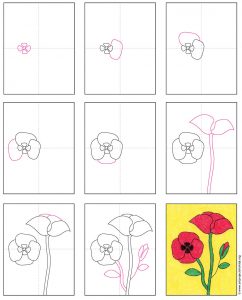
Art Lesson: How to Draw a Poppy Flower
The wearing of poppies in honor of America’s soldiers is traditionally done on Memorial Day. In war-torn battlefields, the red field poppy was one of the first plants to grow. We are going to draw a Poppy this week.
This art lesson breaks down the petals into simple steps. If you start with the center, and then turn your the petals around, you’ll have a nice pattern and won’t have to erase any overlapping shapes.
MATERIALS:
Drawing paper
pencil
black marker
crayons
DIRECTIONS:
Start with the center of the poppy made up of four small ovals
Add a petal to the right with a bigger oval.
Draw a petal on the top with the same size oval as the one before.
Add a petal to the left.
Draw a petal on the bottom. This makes the top view of a poppy.
Start the side view poppy next to the top view.
Add petals to the top of the side view (see picture of directions)
Finish by adding a stem and leaves.
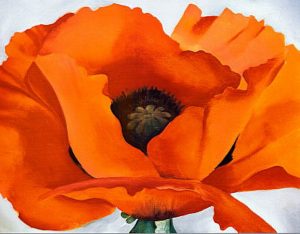
Here is a Poppy Flower painted by American Artist Georgia O’Keeffe
May 19-22 2020
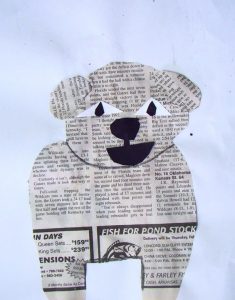
Art Lesson: Teddy Bears on Parade
Hello everyone! This week we are going to draw and make a Teddy Bear. I will show you how. Mrs. Sanchini is asking everyone to place a teddy bear or a drawing of a teddy bear in a visible area like on a windowsill, a porch or near a mailbox.
We would like you to decorate the Teddy Bear for Memorial Day by adding a US flag or other patriotic symbol. Send Mrs. Sanchini lsanchini@hamptonschool.org a picture of your Teddy Bear and don’t forget to share it in Google Classroom with me. The Teddy Bears are going to be in a parade for Memorial Day.
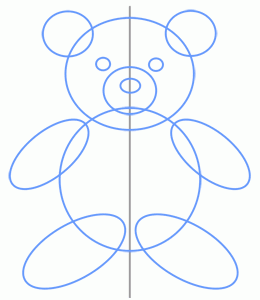
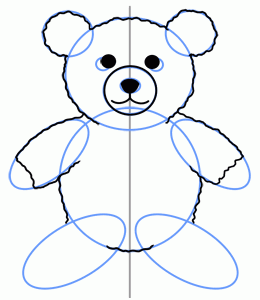
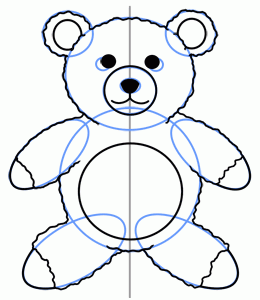
MATERIALS:
White and Black Paper, or you can cut up a clean
Brown Paper Bag to make your Teddy Bear
pencil, erasure
crayons
Permanent sharpies markers
Glue if you are going to cut out a Bear.
DIRECTIONS:
Gather together your materials. You need to decide on what kind of Teddy Bear you will make. If it’s a black and white bear, start with a white piece of paper. If it’s a brown bear, start by cutting a brown paper bag and opening it up, and flatten it out.
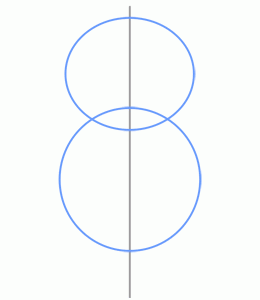
Now we can draw with pencil first, the shape and size of the bear. Teddy Bears are soft and cuddly and made up of round circles and ovals. Start with a large circle for the Teddy Bears body. The circles done have to be perfect 😉 Next draw a smaller circle for the head and place it on top of the body, add two small circles on top of the bears head for the ears. Add ovals for the legs and smaller ovals for the arms. Then add the details of the bears face. Two circles for the eyes, a small circle for the bears muzzle in the center, then an even smaller circle for the nose. The mouth is a straight line down from the small circle of the nose, and at the end of that line, add two small upside down “C’s” on each side of the straight line to finish the mouth.
Erase any lines that overlap and color in your bear. Chalks work great on brown paper. Use a black marker for the details like paws, and eyes.
If you are building your bear cut out the shapes of the circles and glue them together.
May 12-15 2020
Art Lesson: Rainy Day Fan Umbrellas
We are going to make a pop up umbrella card with a picture of YOU under the umbrella. Once you have made your fan umbrella attach it to a folded paper.
See example: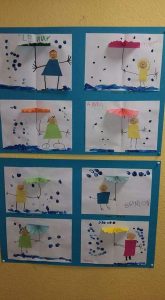
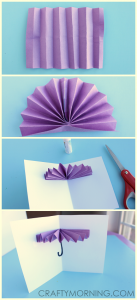
MATERIALS:
white sheets of paper 5.5″x 10″ folded in half for the card
a colored piece of construction paper 5.5″ x 6.5″ for the fan
markers or crayons for the “J” handle of the umbrella
a second colored paper for a shape for your body
glue stick or cellophane tape
DIRECTIONS:
This project is built in two parts. The first part is to make a fan by folding the paper back and forth and creasing it as you go. Once the fan is made, fold the fan in half and glue or tape the edges together to make a fan shape. Glue the ends of the fan to each side of the white paper. Center the fold of the fan on to the center of the card.
Once the fan is attached, make a “J” shape with a marker or crayon for the umbrella handle. See the example. With the umbrella made, now cut out your favorite shape for your body. It could be a circle, square, rectangle, or triangle out of a second color of construction paper and glue it down under the umbrella fan. To the body shape, add a round head, with eyes nose and mouth. Don’t forget feet and then the rain. You can draw in a big rain storm or a gentle rain.
May 5-8 2020
Art lesson: Texture Rubbings Collage
A collage is a collection and arrangement of shapes or textures put together in a new way to create a NEW picture. What kind of textures did you make last week? Did you find all different kinds? You can make more this week, if you need more.
MATERIALS:
5 or more texture rubbings from last week
crayons in different colors
textured surfaces look around for what might make a good texture.
scissors
glue stick
DIRECTIONS:
For this week’s project, take the textures you made from last week and cut them up into a NEW picture. Cut out large, medium and small shapes for your collage. Glue down your cut out shapes/textures and when you have spent some time and thought played with arranging the shapes, use your imagination to see what you could make. What can you make using all 5 of your textures. It’s okay if you have more than five! Your textures can be in color with crayons or in pencil.
April 28-May 1st 2020
Art lesson: Texture Rubbings
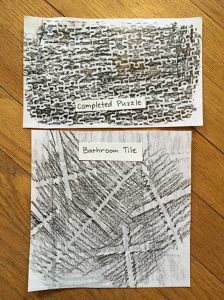
We are going to make rubbings for this week by finding five or more textures.
Texture is one of the Art Element and it shows how something LOOKS to touch or feel, in a picture.
Find objects around the house that make a good rubbing, like a bottom of a shoe, a piece of burlap, a lego…
ANYTHING can make a texture! You never know what might make a good rubbing, so experiment.
A good rubbing is a clear pattern showing how the object feels to the touch.
Tips for good rubbings:
Press hard enough for the rubbing to show, but not too hard that tears the paper.
Use the thick, wide side of the crayon. You can peel the crayon to make it easier.
You can use a pencil if you use the side of the pencil.
MATERIALS:
white sheets of paper
crayons in different dark colors
textured surfaces look around for what might make a good texture.
DIRECTIONS:
To make a rubbing, place a piece of white paper over a surface that has a texture
you think might make a good rubbing. This video shows you how https://www.youtube.com/watch?v=kkBdTEOiAaI
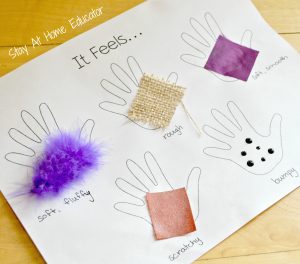
Textures can be bumpy, or rough, or soft. Use a DARK flat piece of crayon, and hold the paper still.
You can tape the paper down to help with holding it. Or have an adult help you hold the paper down.
Save your work and make at least five or more DIFFERENT textures. Don’t forget to post your texture drawings.
April 21-24
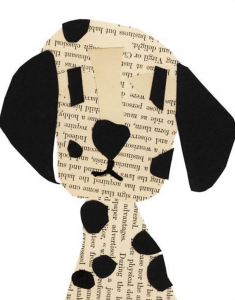
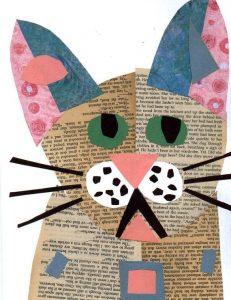
Art lesson: Newspaper Pet Pictures
We love our animals and have many different kinds for pets. If you have a pet, I’d like you to make a picture of your pet out of construction paper and newspaper shapes. If you don’t have a pet, then use your imagination and think up what kind of a pet would you have, if you could have one.
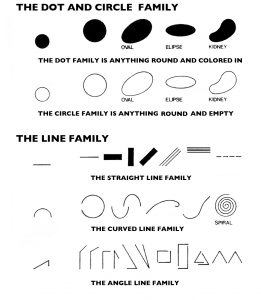
When we learned about shapes, we learned about the shape families. Remember there was the Circle family, the Dot family, the Straight Line family, the Curved line family and the Angle line family.
Materials:
Newspaper and construction paper
crayons or markers
black thin sharpie for the face
glue stick
scissors
Directions:
Use the Dot family to draw a large shape for the body of your pet animal. Cut the shape out of newspaper and glue it to another sheet of paper for the background. Then cut out a smaller dot shape for the head and glue it neatly to the top of the body. Add the details of the face and body, such as eyes, nose, ears, mouth, tails, arms and legs. Use the 5 Elements of Shape to build your Pet. Remember to post your Artwork!
April 14th-17th
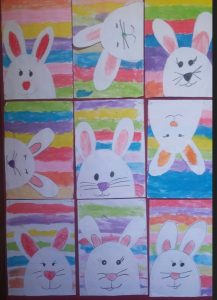
New Art lesson: After Easter Bunnies
It’s so much FUN to draw these bunnies and glue them to a striped or rainbow background. You will need two pieces of paper, one for making the bunny and one for coloring in a background.
Materials:
Two pieces of white paper 8.5″x 11″
crayons or markers
black thin sharpie for the face
glue stick
scissors
Directions:
To make the bunny: Draw one large oval (for the bunnies body) cut it out. Then draw two long thinner ovals for the bunnies ears and cut them out. Glue the ears onto the large oval at the top. Color in the pink part of the ears and draw eyes, nose and mouth with whiskers for the bunnies face. set that aside. Adults may need to help with building the bunny.
To make the background: On the second sheet of paper, make a series of fat stripes or rainbow arcs. Make the stripes change color and fill the paper from one edge to the other. Children should be able to do this on their own.
Glue the bunny onto the background cutting off the lower half of the oval (body). After moving the bunny to different edges of the background paper, decide to place the bunny where it looks best.
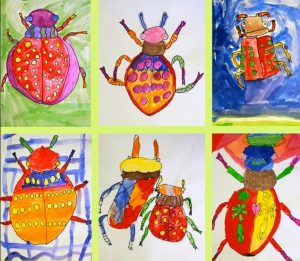
April 7-10
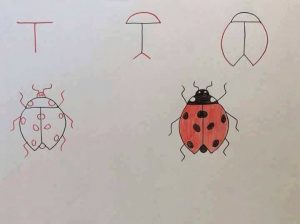
New Art lesson,
Spring time is a time for BUGS! And, the lady bugs are waking up. Here how to draw a Lady Bug.
Start with a big capital “T” on a piece of white drawing paper or copy paper. Add a short sideways “C” on top of the “T” for the Lady Bugs head and at the bottom of the “T” draw an upside down “V”. See our example.
Next, add the wings on the side with longer curved lines, connecting the top line of the T and the upside down “V”. Add three zigzag lines on each side of the lady bug for a total of six legs.
Color in the head of the lady bug black with crayon or markers, don’t forget the little head and eyes AND spots for finishing details. Color in the wings of the lady bug red and leave room for the white oval spots. For extra creativity, can you make your OWN bug out of a letter of the alphabet? I would LOVE to see that 🙂
Take a look online to what kinds of different shapes and colors bugs come in. Observe how many legs they have! What is YOUR favorite BUG?
I know you LOVE Dinosaurs, too, so I thought this would be fun for you. If you don’t have any Dinosaur toys, you can do this Art idea with any toy. Experiment and see how shadows work. When you trace the shadow use a pencil and go slow. Ask an adult to help you set up the light to make the shadow. Post a picture of your drawings.
Materials: Dinosaur toys, white paper or roll of paper, pencils, erasures, markers light source.
Directions: Roll out a piece of white paper, and position your toys along the edge. Have an adult set up a light source and watch as the light makes shadows on the paper. Use a pencil and trace slowly and carefully the outline of the shadow. When you are done, color in your shapes. Add details and make a Dinosaur environment, like trees and bushes, lakes and sky.
For added fun, make hand shadows on a wall. You can trace those, too.