Hello parents of Pre-K students.
June 2-5 Art Lesson: Expand on a Picture
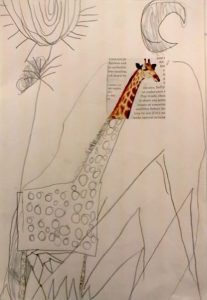
This art lesson can be so much fun for your children! Cut out snippets of clear images from a magazine. Choose pictures that appeal to your child’s interests. Pictures of animals are a good choice, but any picture can work, between 1.5″ and 2″ is a good size to start with.
MATERIALS:
White piece of paper
magazines or photos
glue
scissors
pencils
markers
DIRECTIONS:
Have your child choose a picture they like, then glue that down on to a piece of white paper. When the glue is dry, ask your child to use their imagination and draw in the rest of the picture. Have them focus on details and maybe make up a story about their picture. This is a wonderful art project to exercise their imagination.
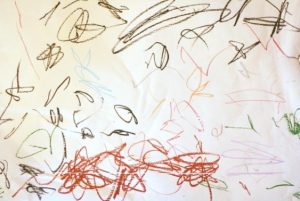
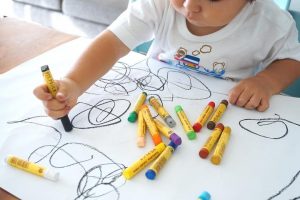
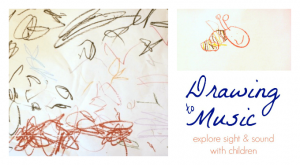
May 26-29 Art Lesson: Drawing Lines to Music
What is your favorite song? Is it slow, soft, loud, fast?
For this weeks art lesson, I would like you to draw as many different kinds of lines on a piece of paper, as you can think of! Make your lines dance to your favorite song. To see what kinds of lines to draw, you can watch this video called the Line Song. https://www.youtube.com/watch?v=DQEVllmeWH4.
We have talked about the different kinds of line there are in Art, remember the Larry the Line Poem? If you don’t remember you can watch it here https://www.youtube.com/watch?v=0PgERZ03cXo
Have fun with this! Use colored markers or crayons. Scribbles are okay as lines dance across your paper making an interesting picture to your favorite music. Your picture might come out like one of these.
Art Lesson: May 19-22 Teddy Bears on Parade
Hello everyone! This week we are going to draw and paint a Teddy Bear. Mrs. Sanchini is asking everyone to place a drawn or painted picture of a teddy bear in a visible area like on a windowsill, a porch or near a mailbox.
We would like you to help your child decorate a Teddy Bear for Memorial Day by adding a US flag or other patriotic symbol. Send Mrs. Sanchini lsanchini@hamptonschool.org a picture of the Teddy Bear and don’t forget to share it in Google Classroom with me. The Teddy Bears are going to be in a parade for Memorial Day.
Teddy Bear template: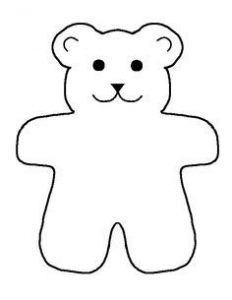
MATERIALS:
Teddy Bear template (make one for your child to trace)
brown paint or brown crayon
ground cinnamon
paint brush
cardstock or heavy paper
scissors (pinking shears make a cool edge if you have them)
wiggle eyes or buttons if you have them.
if not draw in the eyes with
a marker.
DIRECTIONS:
Have the children trace the Teddy Bear template you made for them on a piece of heavy white paper. Paint the Teddy Bear or color it in with a brown crayon. Adding cinnamon to brown tempera paint gives these teddy bears texture and they smell good, too. Protect the painting surface with plastic or newspaper as your little one paints. Let it dry, then cut it out and add eyes and a button nose. You may need to help on the curves. Encourage your child to add details, like paws, a bow or a tummy.
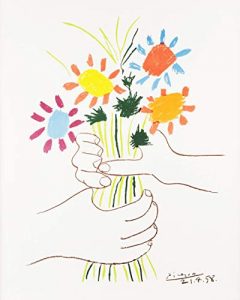
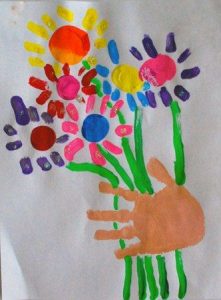
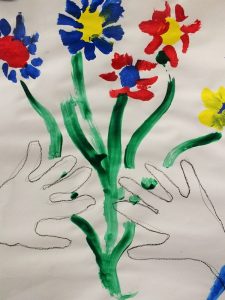
May 12-15 Art Lesson: Picasso Spring Bouquet
This week in honor of MOM we are going to make a painting (if you have paints) or draw (if you have crayons) a bouquet of flowers.
MATERIALS:
White paper 12″x 18″ vertical (up and down orientation)
pencil
tempera paints, acrylics, watercolors
black marker
DIRECTIONS:
Have the children first draw the stems of the flowers with a gentle curved line across the vertical paper. Then, trace your child’s hand/s across the stems. You can also trace both hands too. The hands can be colored or painted in to hide the stems. Paint or color the stems green. Using circles and place large, medium and small circles on top of the green stems. Use bright colors to color in the circles. Place smaller lines around the circles for the petals.
Show and point out that a very famous artist Pablo Picasso made this picture of a bouquet of flowers.
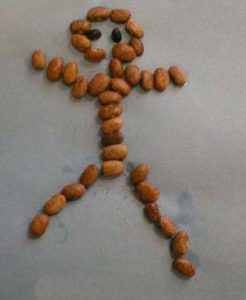
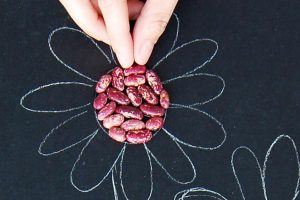
May 5-8 Art Lesson: Seed Mosaic Art
Children this week are asked to glue different kinds of beans or seeds on paper to make a Seed Mosaic. You can draw out a simple shape for them to fill in or they can do it themselves.
MATERIALS:
Variety of beans and seeds in various colors
set out in little dishes.
piece of card stock or cardboard
white glue
pencil
erasure
DIRECTIONS:
Have the children first draw an outline of a picture with a pencil. Keep the drawing small and simple. Any subject or shape is fine. Shown is a picture of a person, but it could be anything they want to make. They could even start by just gluing the beans down to see what they could make. Then fill the picture in with a variety of beans and or seeds. Collect seeds of all sorts of shapes, sizes and color. Rice, beans, bird seed, corn kernels, and sunflower seeds are examples of seeds that you can use. Work on the mosaic a section at a time. Start with one shape or section in your picture. Squeeze some glue inside the shape. Spread the glue with your finger or a paint brush.
If you don’t have any beans or seeds, try using pasta or small macaroni.
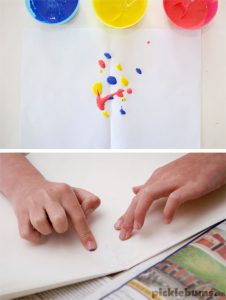
April 28-May 1st Pre-K Art Squish Paintings
This week we are going to make a Butterfly painting. The art concepts are primary colors,
red, yellow, blue that blend to make the secondary colors purple, orange and green,
and the symmetry of a butterfly.
Tempera paints or acrylic paints in primary colors work really well (red, yellow, blue).
Add a little water to the paints if they are too thick, paints should have the consistency of runny yogurt.

MATERIALS:
Paint (pick three colors start with red, yellow and blue)
White Paper (big pieces will be less messy)
Plastic spoon or brush to drip and drop the paint onto the paper in a small blob
Newspaper to cover your work surface,
Smock or apron and a damp cloth (for messy fingers, this project can get messy!)
Somewhere to dry all the creations – these will need to be dried flat.
Make more than one and add a drawing to it once it’s dry
markers
Scissors
DIRECTIONS:
Start by folding a piece of paper in half then opening it up again.
This helps identify the center of the paper and makes it easier to fold
and squish the paints later on.
Drop small blobs of paint around the middle of your paper. Don’t put paint to
close to the edges or if you put on too much paint it’ll turn into a sludgy mess later,
so try and stick roughly to the middle and don’t use too much paint.
Open up the folded paper to reveal your butterfly. Let it dry flat.
Does it look like a butterfly or something else? Is it symmetrical?
When the painting dries, add eyes, antennas and legs. You can cut out the butterfly too.
April 21-24 Pre-K Cosmic Suncatchers
In honor of EARTH day, April 22 these beautiful “Suncatchers” are easy and fun to make.
https://babbledabbledo.com/art-for-kids-cosmic-suncatchers/
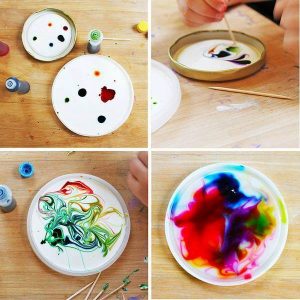
Materials:
White Glue and lots of it!
Food Coloring or Liquid Watercolors
ToothpicksPlastic lids (Lids from tubs of yogurt, hummus, sour cream etc. work best, although metal lids also work)
Hole Punch
String
Directions:
Pour a generous amount of glue into one of your plastic lids and swish it around to cover the entire inner surface.
Have your child put one or two drops of each color of food coloring around the glue. Give your child a toothpick to swirl the colors around in the glue. Stop swirling before the colors get too combined or the final result will be muddy and brown. This is an exercise in restraint!
Let dry. As the colors settle they will continue to expand and create a tie-dyed effect. Depending on how much glue you used, the suncatcher will take one to three days to fully dry. You will know it’s ready when the edges start to peel off the lid.
When fully dry, peel the suncatcher off the lid, punch a hole through the top, add a string, and hang in a sunny spot.
New Art Lesson
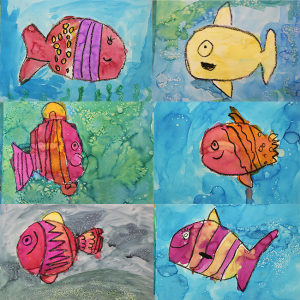
April 14-17
Tomorrow is opening day for Fishing season! So, we are going to draw and color FISH. Making a fish is easy, just draw a large oval. You can decorate you fish with eyes, mouth and fins. Make your fish big and if you have room make some small ones, too. See examples.
Listen to this story: https://www.youtube.com/watch?v=HwAQvHBCY2M “You Be You”
Look at all the beautiful FISH designs in this story. Color your fish with markers or crayons.
Materials:
Drawing paper 8.5″x 11″
pencil
erasure
markers or crayons.
watercolors if you have them.
Directions:
Draw a large oval on your paper. At one end of the oval make a tail fin with a triangle. At the other end of the oval draw in an eye and mouth. Around the sides of the oval, draw a small triangle for the top fin and/or bottom fin. Color in your fish with stripes, circles and lines. Use lots of colors. If you have watercolor paints, paint blue around the fish for water.
New Art idea for Spring
April 7-10
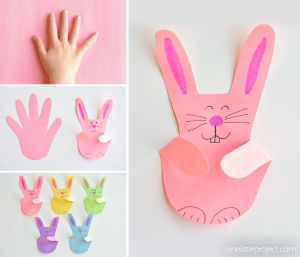
Your children will love to make these cute bunnies! Maybe they could make one for the whole family?!
Let them pick out pastel color pieces of paper for their hand bunny rabbit. Point out the difference between dark and light colors. Discuss what a pastel color is.
Materials:
8.5″X 11″ color card stock or 9″x 12″ colored construction paper -perfect for this art idea.
scissors
pencil
Directions:
Have your child place their hands down onto the paper and either you are they can slowly and carefully trace their hand.
Once the hand is traced with a pencil, carefully have them cut out the shape of the hand. (This will be tricky for them and they might needs some help) Showing them how to cut around curved shapes. When done, cut out the middle finger forming the top of the head of the bunny. This will leave room for the two long ears.
Using crayons or markers, color in a solid long pink oval for the inside of the ears. Then color in a small circle for the nose of the bunny in the center of the bunnies face. Add, two “C’s” or short curved lines for the bunnies eyes, and six short diagonal lines coming off the bunnies nose.
To make the bunnies nose and mouth, add a straight line down from the center of the nose, like the shape of the letter “J”. Reverse the j shape for the other side of the nose. Add two small rectangles under the j’s and the face is done.
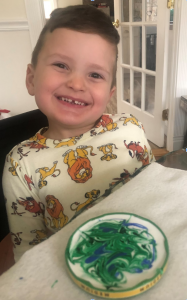
Bend the two remaining “fingers” of paper down towards the bottom of the bunny, and draw two more short curved lines for the feet. Add three straight lines inside each foot shape and there you have it! A very cute bunny!
Hey, LOOK Kenzie made a VERY cute bunny, it came out so good!
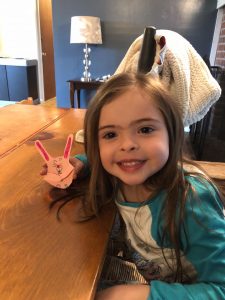
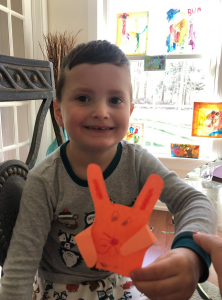
Kenzie and Ben made their bunnies!
This page is for Art ideas to do with your child. Please help your child with cutting and gluing. I will keep the ideas simple and fun 🙂
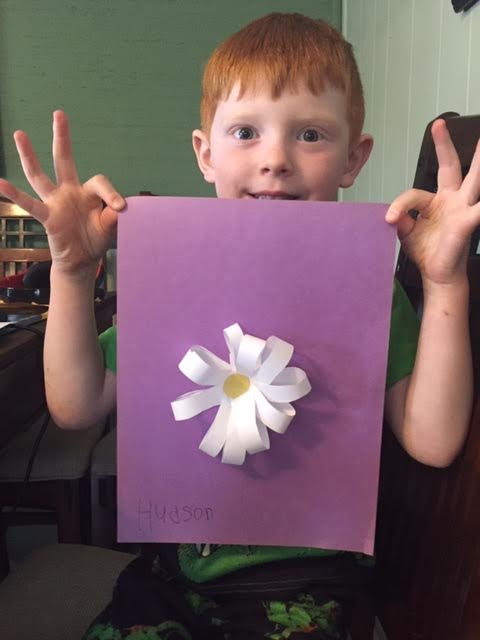
Our first online Art lesson is making a 3-D Daisy. With Spring coming fast, my flowers are starting to bloom. Daisy’s aren’t quite up yet, but the children might have fun making them.
Materials: you need scissors, glue stick, yellow crayon or marker, white copy paper is fine and a piece of background paper, like a piece of construction paper in a dark color.
Directions: cut out 5 or 6 THIN strips of white paper, roughly 1/4″ by 12″. Fold each strip in half but do not crease the paper, create a round petal on both sides of the strip, see picture. Glue the ends of the paper strips into the center. Do this with all the strips cut out.
Let your child do as much of the building and cutting as they can. Pile the folded strip “petals” by their centers and space them evenly around the center.
Glue them down together. Next, trace a small circle, using a cap or draw it freehand (much harder) and color the circle yellow. Cut out the yellow circle. If you have yellow construction paper you can use that instead. Glue the yellow circle on top, in the center of the petal strips.
Build as many 3-d flowers as you want. Talk about cutting and gluing neatly, the difference between 2-d and 3-d or flat and popped up. You can have your child add a stem or leaves, to add to their picture. If it is too hard to for your child to cut thin paper strips, you can draw a line with a ruler on the white paper for them to follow.
You can also cut individual paper strips instead of one long one to fold in half.
Post a picture of your creations! Thank you.
Daisy Flowers
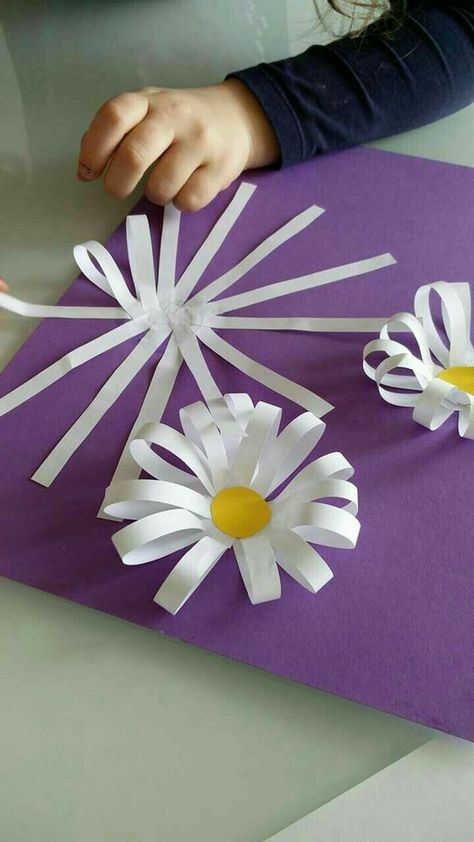
Hudson made one, too!