Hello Kindergarten.
June 2-5 2020
Art Lesson: Soap Boats
This week we are going to make SOAP BOATS for playing in the water! You can float your boat in the sink or tub or even outside when it’s hot out.
Decorate the sail of your boat with bright colors! You can make a picture on your sail, too. Try floating your boat for a race 🙂
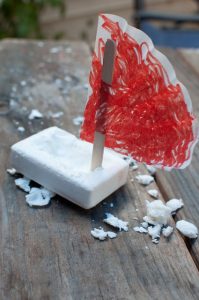
MATERIALS:
Coffee Filter or you could use a piece of paper.
Ivory Soap (this brand floats, you can try others but be aware it might not float)
Popsicle Stick
Markers in many colors
DIRECTIONS:
Simply insert the sail into the complete bar of soap. Cut a coffee filter into quarters to make a sail. Using pens or crayons decorate your sail. Attach the sail to a popsicle stick. You can do this with tape, or you can do it by cutting a small line just above the base of the sail and just below the tip and threading the mast through. Push the bottom of the popsicle stick into the soap bar.You are now ready to float your boat.
Tips
Ivory Soap Floats because the manufacturers whip air into the soap when they are making it, resulting in a bar of soap that is lighter than water. It is this same quality that makes the soap easy to lather. Hollowing out the boats makes it lighter and is easily done with a small (1tsp) measuring spoon. If you don’t have a bar of soap, consider using a piece of wood or plastic.
May 26-29 2020
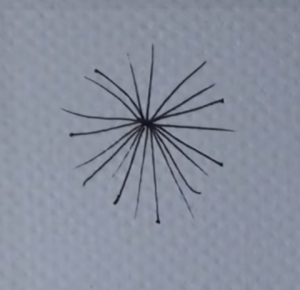
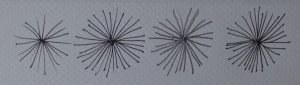
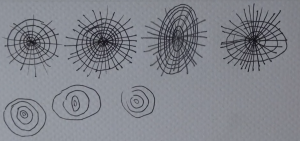
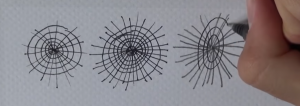
Art Lesson: Lines and Circles
For this week we are going to be practicing drawing. You only need a pencil and paper. If you are brave, use a pen to make your drawings. Try not to erase. Start by putting a DOT on your paper anywhere you want. Then draw straight lines coming out of the dot. Go all the way around the dot like the rays of the sun, these look like sun bursts! Make small, medium and large sun bursts all over your paper. Then, tray to make concentric circles (circles inside circles) around the sun bursts. Try to get those circles evenly spaced apart! Once you can make circles, try it with ovals. When you are done, how about coloring in some of the spaces the circles and rays made. You can use markers or crayons to do that.
May 19-22 2020
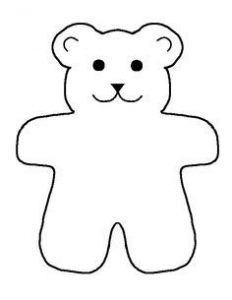
Art Lesson: Teddy Bears on Parade
This week we are going to draw and paint a Teddy Bear. Mrs. Sanchini is asking everyone to place a drawn or painted picture of a teddy bear in a visible area like on a windowsill, a porch or near a mailbox.
We would like you to help your child decorate a Teddy Bear for Memorial Day by adding a US flag or other patriotic symbol. Send Mrs. Sanchini lsanchini@hamptonschool.org a picture of the Teddy Bear and don’t forget to share it in Google Classroom with me. The Teddy Bears are going to be in a parade for Memorial Day.
Teddy Bear template:
MATERIALS:
Teddy Bear template (make one for your child to trace)
brown paint or brown crayon
ground cinnamon
paint brush
cardstock or heavy paper
scissors (pinking shears make a cool edge if you have them)
wiggle eyes or buttons if you have them.
if not draw in the eyes with
a marker.
DIRECTIONS:
Have the children trace the Teddy Bear template you made for them on a piece of heavy white paper. Paint the Teddy Bear or color it in with a brown crayon. Adding cinnamon to brown tempera paint gives these teddy bears texture and they smell good, too. Protect the painting surface with plastic or newspaper as your little one paints. Let it dry, then cut it out and add eyes and a button nose. You may need to help on the curves. Encourage your child to add details, like paws, a bow or a tummy.
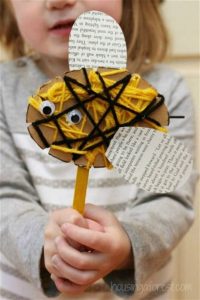
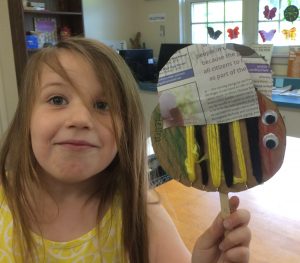
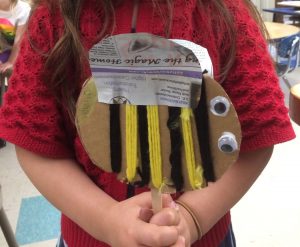
May 12-15 2020 Art: Bee Puppets Please 🙂
For this week, Kindergartens are going to make a cardboard Bee Puppet. See examples below. We love making these Bees! The body of the bee is made of cardboard with little cuts in the top and bottom of the bee for yellow and black yarn to wrap around the cardboard. An Adult needs to cut out a piece of cardboard shaped in an oval for the bee’s body. The bees wings are made of newspaper cut in. the shape of a “D” and a toothpick for a stinger is stuck in the back of the bee. Bee’s eyes can be wiggly eyes if you have them or you can make them out of white and black paper.
MATERIALS:
Cardboard ~ cut into an oval
Yarn ~ black and yellow
Old Book or newspaper ~ one that you don’t mind cutting up (newspaper)
Googly Eyes or bits of white and black paper
White Glue
Popsicle stick
Tooth-pick ~ optional (for the stinger)
DIRECTIONS:
Precut oval pieces of cardboard with an adult. Then precut little slits or grooves all the way around the cardboard oval. This made it super easy for your child to wrap their yarn around the oval. Wrap a pattern of yellow and black.
Start with yellow yarn, and moved onto the black. Tie the 2 colored ends together. No tape was needed.
Add googly eyes with glue and little stinger. Make wings from old book or newspaper. Wax paper alternative for wings. Turn bees into puppets with the addition of a pop stick.
Bee Jokes:
What is a bees favorite food?
Bee-nut butter and honey sandwiches
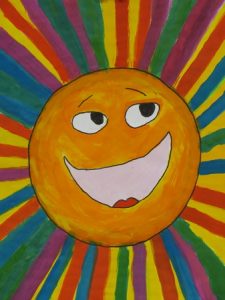
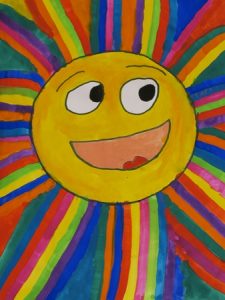
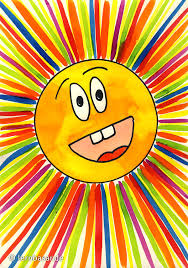
May 5-8 2020 Art: Sunsational Suns
It’s the first week in May and the weather is getting warm because of the SUN! The plants are growing, the leaves on the trees are coming into bloom, the grass is turning green. The sun is warming everything up. For this week, we will be drawing SUNS! Not little suns in the corner of our artwork, rather the whole paper will be the sun.

MATERIALS:
white 9″x 12″ paper
pencil
erasure
magic markers or crayons
DIRECTIONS:
On a piece of white 9″x 12″ paper or what you have, trace out a large circle, make sure the circle fills the center of your paper. What could you use to trace a large circle with? A bowl? A roll of tape?
Draw a face on the circle, this will be the sun’s face, and outline it with black marker when you are happy with the face. Make two smaller circles for the suns eyes and a big smiley mouth in the shape of a D laying on its side. Color in the suns face with yellow or orange marker or crayon, but don’t color over the eyes! In the eyes make a smaller black circle in each eye. Make the small black circles to one side of the white eye circles. Then make a C shaped line over the eyes for eyebrows. See this posted examples. When you have colored in the mouth and eyes, then it’s time for the suns rays. Using the side of a thick marker draw straight lines out from the edge of the suns face to the edge of your paper. Continue all the way around the circle until the whole paper is filled up with the suns rays. Make the suns rays using different colors. Remember that the warm colors are red, orange, and yellow, use those colors for the face. You can use green, blue and purple for the suns rays as well as red, orange and yellow.
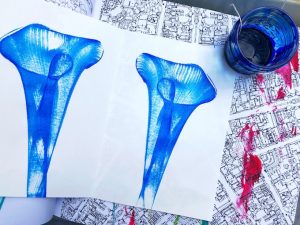
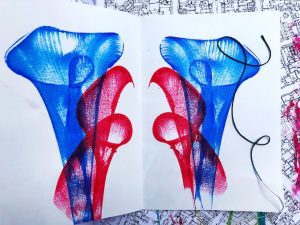
April 28- May 1st 2020 Art: String Pulling Flowers
Making flower shapes with String pulling is FUN, and you never know how it is going to turn out.
It’s a surprise each time you do it. Start with one color and then you can add a second or third once you practice.
Admire the super cool designs and details the string made as it was pulled between the two pieces of paper!
MATERIALS:
Paint in a small bowl tempera paint works best
but you can use acrylics or ink
String or yarn
Paper or a sketch book
DIRECTIONS:
First, put down a newspaper or piece of protective paper to protect your working
space from getting paint all over. This can be messy, but it’s worth it!
Cut off a piece of string between 12 and 18 inches (length depends on size of your paper)
and add it to the small bowl of paint. Use a spoon or your finger to stir it around,
covering the string in paint, you can let the string soak up the paint for a minute.
Then lift the string out of the paint, run your thumb and forefinger along the length
of the string to remove excess paint (make sure to do this part; it makes a big difference).
Your fingers will get paint on them, you can use gloves if you wish.
NOTE: You can use different colors on one string. For example one third red, one third yellow, one third blue!
The result is awesome 🙂
Next, is to arrange the paint-covered string on paper with one end of the string reaching off the edge.
Lay the string down slowly.
At this point you will probably want to wash the paint off your hands.
Keep a bowl of warm soapy water and a cloth rag in the studio for
washing hands in between steps.
Cover the string with second piece of clean paper.
Set the second sheet of paper over the paint-covered string and
then place a flat weight of some sort over the paper
(A book or box or something would work).
Place clean hands on top of the two papers to hold the string down.)
Slowly pull the string out from between the two sheets of paper.
Lift the second sheet off of the first and there you have a beautiful flower design.
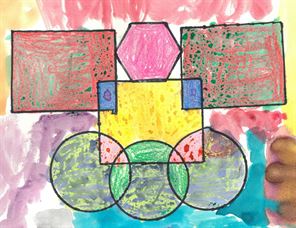
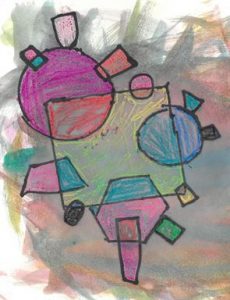
April 21- 24 Art: Overlapping Shapes
Okay, talented Kindergarten! We are going to make a picture using shapes.
Now, you know the basic shapes of a circle, triangle, square, rectangle and some of you even know the more advanced shapes like stars. Which shapes are your favorite? Can you make shapes? Can you make them large, medium and small, too?
Shapes can be fun to trace. If you can find some shapes to trace, like a circle (trace the bottom of a cup) trace large, medium and small shapes.
Draw one shape at a time, carefully with a pencil on a piece of paper. Then, trace another different shape on top of the first shape you drew.
Make sure the shape you are tracing OVERLAPS the first one you drew. Overlap at least 6 or more shapes to make a design. Color in the new shapes with a different color, when a new shape is made from the overlapping shapes. Have fun, playing with where on your paper your overlapping shapes might go. See if you can guess what the different shapes might look like.
Materials:
Drawing paper or what you have on hand
Pencil
Erasure
Water based Markers
Crayons
Watercolor paints (if you have them)
Directions:
Ask your child to draw overlapping shapes on a 9″x12″ drawing paper multiple times (at least 6) with a pencil. Then have them OUTLINE in black crayon the shapes. Then, color in the shapes with crayon. Change the color of the shapes that show overlapping.
Paint background with water color paints, if you have a paint brush and water colors. Post your lovely paintings 🙂
Note: The crayon provides a resist to the watercolor, so that where the crayon coloring is, blocks the water color. This technique has lovely and unexpected results.
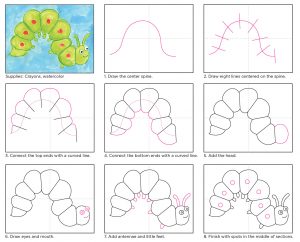
April 14th-17th
New Art idea: The Very Hungry Caterpillar
Listen to the YouTube video of the story by Eric Carle called The Very Hungry Caterpillar. https://www.youtube.com/watch?v=75NQK-Sm1YY
Let’s make our own drawing of a Caterpillar and color it in. Follow along each step, and go slow so you don’t skip any parts. What does your caterpillar eat?
Can you decorate your caterpillar you drew?
Materials:
Drawing paper or what you have on hand
Pencil
Erasure
Markers
Directions:
Listen to The Hungry Caterpillar story, then try and draw your own caterpillar. Start with a large curvy line that fills up most of your paper. Draw 8 straight lines
that cross the curve. Next, add short arcs to connect the tops of the straight lines. Make bottom curves to connect the bottom straight lines (see illustration). On the last curve, make an oval for the head, add eyes, mouth, feet and antennae. Make a pattern on the caterpillar.
April 7th-10
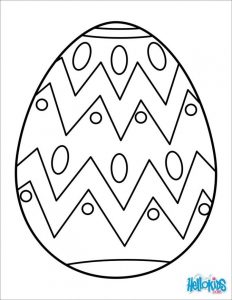
New Art idea:
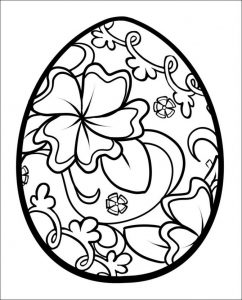
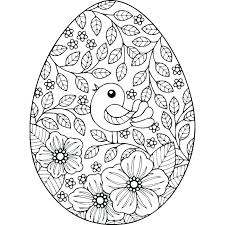
Spring is sprung! And, that means EGGS! Easter eggs, robin’s eggs, turtle eggs, baby chicks from eggs. We are going to draw a big egg and decorate it with designs and patterns.
What you can draw on your egg? Designs are pictures that don’t repeat. Patterns are colors, shapes and lines that DO repeat. Here are some examples of egg designs and patterns. See if you can make up your own egg design or pattern and add color, too.
Email me a picture of your beautiful eggs, I would love to see them.
Materials:
2 pieces of white card stock paper or light cardboard
pencil
scissors
markers or crayons
Directions:
Draw in pencil, a large egg shape, cut it out and use it as a template. (Ask an adult for help with this). Eggs are oval and smaller at the top and a bit larger on the bottom. Trace your template on to another sheet of clean paper and draw with pencil, lines, shapes and pictures to make a design and/or pattern.
Look at these beautiful designs and patterns.
What you can draw on your egg? Designs are pictures that don’t repeat. Patterns are colors, shapes and lines that DO repeat. Here are some examples of egg designs and patterns. See if you can make up your own egg design or patterns. Then add color to the egg.

![]()
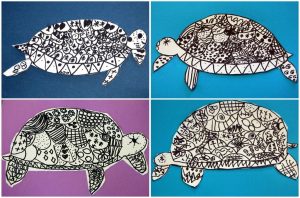
Can you make a drawing of a turtle at home in pencil? We made them in school and had outlined our turtles with black marker. The turtles had patterns on their backs. Can you make a pattern on your turtle? Then, we erased the pencil lines we didn’t want. We were just about to color them and cut them out. I hope you have fun making more turtles!
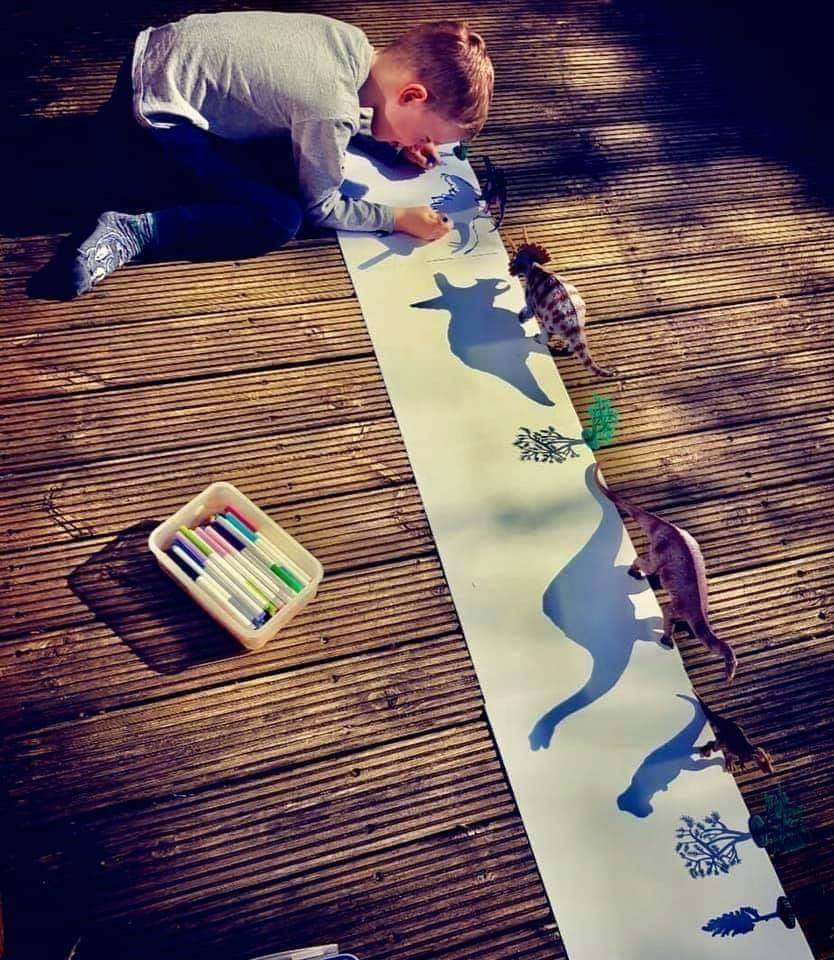
I know you LOVE Dinosaurs, so I thought this would be fun for you. I wonder if turtles were around when dinosaurs were. If you don’t have any Dinosaur toys, you can do this Art idea with any toy. Experiment and see how shadows work. When you trace the shadow use a pencil and go slow. Ask an adult to help you set up the light to make the shadow. Have fun and post a picture of your drawings.
Materials: Dinosaur toys, white paper or roll of paper, pencils, erasures, markers light source.
Directions: Roll out a piece of white paper, and position your toys along the edge. Have an adult set up a light source and watch as the light makes shadows on the paper. Use a pencil and trace slowly and carefully the outline of the shadow. When you are done, color in your shapes. Add details and make a Dinosaur environment, like trees and bushes, lakes and sky.
For added fun, make hand shadows on a wall. You can trace those too.
Dinosaur shadows make a whole landscape for your Dinosaurs